

By Abhrodeep Chanda Youtube for documentation Follow
More by the author: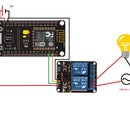
 Using Nodemcu on Phone(For Anything)" width="" />
About: Nothing just a tech enthusiast and by degree an Electrical Engineer More About Abhrodeep Chanda »
In this modern world where everything is digitalised, why not conventional Notice board gets a new look.
So, lets make a Bluetooth controlled Notice Board which is very simple.
This setup can be used in place of static notice board like in colleges/institutes, Hospital/clinics to denote patient serial numbers and how you may use it (DO NOT DISTURB indicator. ).
N.B.: Please read the whole article first it will take 2-3 minutes to read it. Otherwise I will not be responsible for any damage of instruments!!
Mainly 3 components are required :
The accessories are very much guessable potentiometer (that will control the contrast of LCD), jumpers/wires.
Only these are the things we will need for this project.
Above circuit diagram speaks it all for the sake of this project.
The LCD pins are connected to Arduino pin 12, 11, 5, 4, 3, 2 as shown in the circuit diagram now we are more than half way mark. Connect the potentiometer to the shown pin of LCD to control the contrast.
Now comes the bluetooth module and which will have its Rx,Tx pin connected with Tx,Rx pin of Arduino respectively. Battery or power adapter of 5-6V is required.
So, data sent to the bluetooth module using mobile or any bluetooth enabled devices through bluetooth terminal apps are fetched to the Arduino and in return displayed on the LCD.
Arduino IDE has the LCD sketch just the modification is adding the bluetooth serial input with some if- if else statements and while loop.
So the code is written in such a manner that you can notice just by going through the code once.
Now putting innovation into this one can easily make the display scroll right, may be make the text bounce within the screen to go left and right with while looping and delay function.
I have used a app from google play store called "Custom bluetooth app".
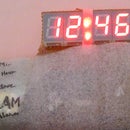
ENJOY the fun while keeping the whole setup outside the door and just changing the data appearing on the screen using a mobile app.
That can be used in different perspectives.
Just innovate to make it more useful with the idea.
If you like the instructable check other IoT, bluetooth home automation, other instructables from me.
Thanks a lot for reading.